日志、跟踪和监控
在使用LangChain构建应用或代理时,您最终会进行多次API调用以满足单个用户请求。然而,当您想要分析这些请求时,这些请求并没有被链接在一起。通过Portkey,来自单个用户请求的所有嵌入、完成和其他请求将被记录并跟踪到一个共同的ID,从而使您能够全面了解用户交互。
本笔记本作为逐步指南,介绍如何在您的LangChain应用中使用Portkey记录、跟踪和监控LangChain LLM调用。
首先,让我们导入Portkey、OpenAI和代理工具
<!--IMPORTS:[{"imported": "AgentExecutor", "source": "langchain.agents", "docs": "https://python.langchain.com/api_reference/langchain/agents/langchain.agents.agent.AgentExecutor.html", "title": "Log, Trace, and Monitor"}, {"imported": "create_openai_tools_agent", "source": "langchain.agents", "docs": "https://python.langchain.com/api_reference/langchain/agents/langchain.agents.openai_tools.base.create_openai_tools_agent.html", "title": "Log, Trace, and Monitor"}, {"imported": "ChatOpenAI", "source": "langchain_openai", "docs": "https://python.langchain.com/api_reference/openai/chat_models/langchain_openai.chat_models.base.ChatOpenAI.html", "title": "Log, Trace, and Monitor"}]-->
import os

from langchain.agents import AgentExecutor, create_openai_tools_agent
from langchain_openai import ChatOpenAI
from portkey_ai import PORTKEY_GATEWAY_URL, createHeaders
在下面粘贴您的 OpenAI API 密钥。 (您可以在这里找到它)
os.environ["OPENAI_API_KEY"] = "..."
获取 Portkey API 密钥
- 在 Portkey 注册
- 在您的 仪表板 上,点击左下角的个人资料图标,然后点击“复制 API 密钥”
- 在下面粘贴它
PORTKEY_API_KEY = "..." # Paste your Portkey API Key here
设置 Trace ID
- 在下面为您的请求设置 trace id
- Trace ID 可以在来自单个请求的所有 API 调用中共享
TRACE_ID = "uuid-trace-id" # Set trace id here
生成 Portkey 头部
portkey_headers = createHeaders(
    api_key=PORTKEY_API_KEY, provider="openai", trace_id=TRACE_ID
)
定义要使用的提示和工具
<!--IMPORTS:[{"imported": "tool", "source": "langchain_core.tools", "docs": "https://python.langchain.com/api_reference/core/tools/langchain_core.tools.convert.tool.html", "title": "Log, Trace, and Monitor"}]-->
from langchain import hub
from langchain_core.tools import tool

prompt = hub.pull("hwchase17/openai-tools-agent")


@tool
def multiply(first_int: int, second_int: int) -> int:
    """Multiply two integers together."""
    return first_int * second_int


@tool
def exponentiate(base: int, exponent: int) -> int:
    "Exponentiate the base to the exponent power."
    return base**exponent


tools = [multiply, exponentiate]
像往常一样运行您的代理。唯一的变化是我们现在将包含上述头信息在请求中。
model = ChatOpenAI(
    base_url=PORTKEY_GATEWAY_URL, default_headers=portkey_headers, temperature=0
)

# Construct the OpenAI Tools agent
agent = create_openai_tools_agent(model, tools, prompt)

# Create an agent executor by passing in the agent and tools
agent_executor = AgentExecutor(agent=agent, tools=tools, verbose=True)

agent_executor.invoke(
    {
        "input": "Take 3 to the fifth power and multiply that by thirty six, then square the result"
    }
)
[1m> Entering new AgentExecutor chain...[0m
[32;1m[1;3m
Invoking: `exponentiate` with `{'base': 3, 'exponent': 5}`
[0m[33;1m[1;3m243[0m[32;1m[1;3m
Invoking: `multiply` with `{'first_int': 243, 'second_int': 36}`
[0m[36;1m[1;3m8748[0m[32;1m[1;3m
Invoking: `exponentiate` with `{'base': 8748, 'exponent': 2}`
[0m[33;1m[1;3m76527504[0m[32;1m[1;3mThe result of taking 3 to the fifth power, multiplying it by 36, and then squaring the result is 76,527,504.[0m
[1m> Finished chain.[0m
{'input': 'Take 3 to the fifth power and multiply that by thirty six, then square the result',
 'output': 'The result of taking 3 to the fifth power, multiplying it by 36, and then squaring the result is 76,527,504.'}
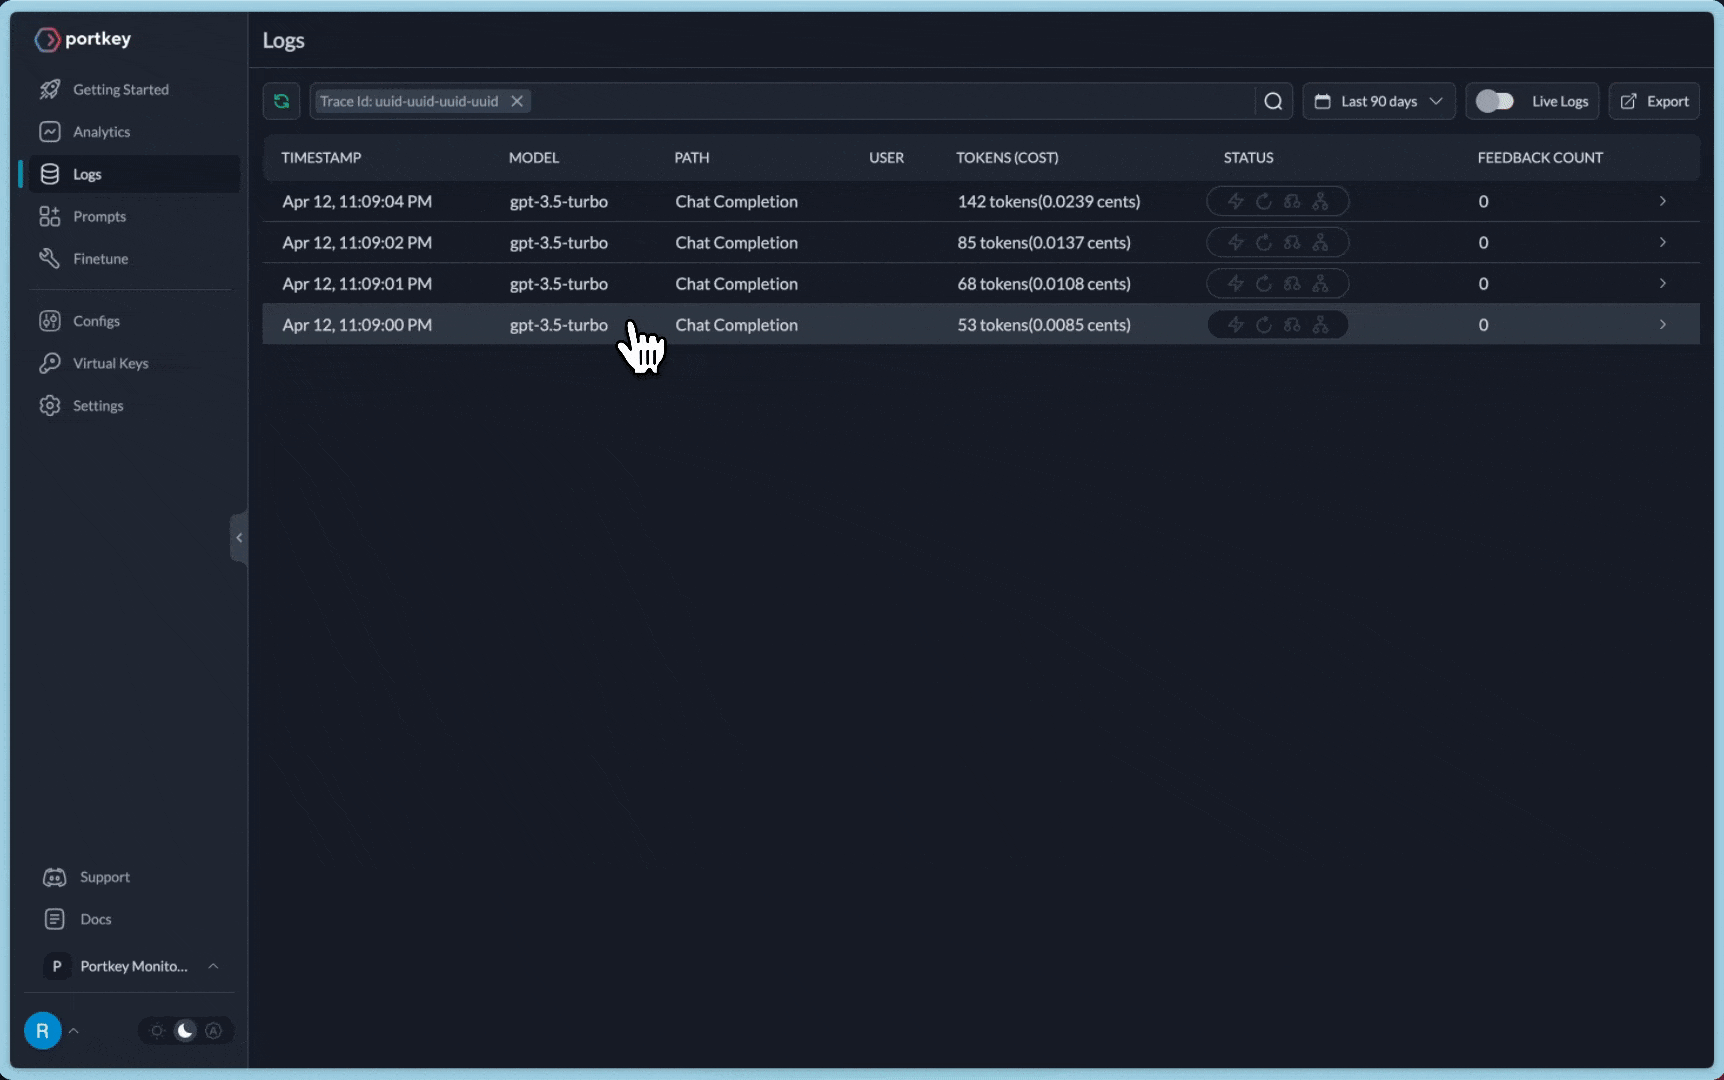
Portkey上的日志记录与追踪工作原理
日志记录
- 通过Portkey发送请求确保所有请求默认都会被记录
- 每个请求日志包含
��时间戳、模型名称、总成本、请求时间、请求json、响应json以及其他Portkey功能
- 追踪ID与每个请求一起传递,并在Portkey仪表板的日志中可见
- 如果需要,您还可以为每个请求设置一个独特的追踪ID
- 您还可以将用户反馈附加到追踪ID上。更多信息请点击这里
对于上述请求,您将能够查看整个日志追踪,如此
高级 LLMOps 特性 - 缓存、标记、重试
除了日志记录和追踪,Portkey 还提供更多功能,为您现有的工作流程增加生产能力:
缓存
从缓存中响应之前服务过的客户查询,而不是再次发送给 OpenAI。匹配精确字符串或语义相似字符串。缓存可以节省成本并将延迟减少 20 倍。文档
重试
自动重新处理任何未成功的 API 请求 最多 5 次。使用 指数退避 策略,间隔重试尝试以防止网络过载。文档
标记
使用预定义标签详细跟踪和审计每个用户交互。文档